
USER GUIDE & SUPPORT
In this section, we’ll take you through the basic setup process for the RØDECaster Pro II, including connecting headphones and speakers, connecting and setting up microphones, instruments and other devices, updating firmware, and more.
USER GUIDE & SUPPORT
In this section, we’ll take you through the basic setup process for the RØDECaster Pro II, including connecting headphones and speakers, connecting and setting up microphones, instruments and other devices, updating firmware, and more.
The Start-up Process
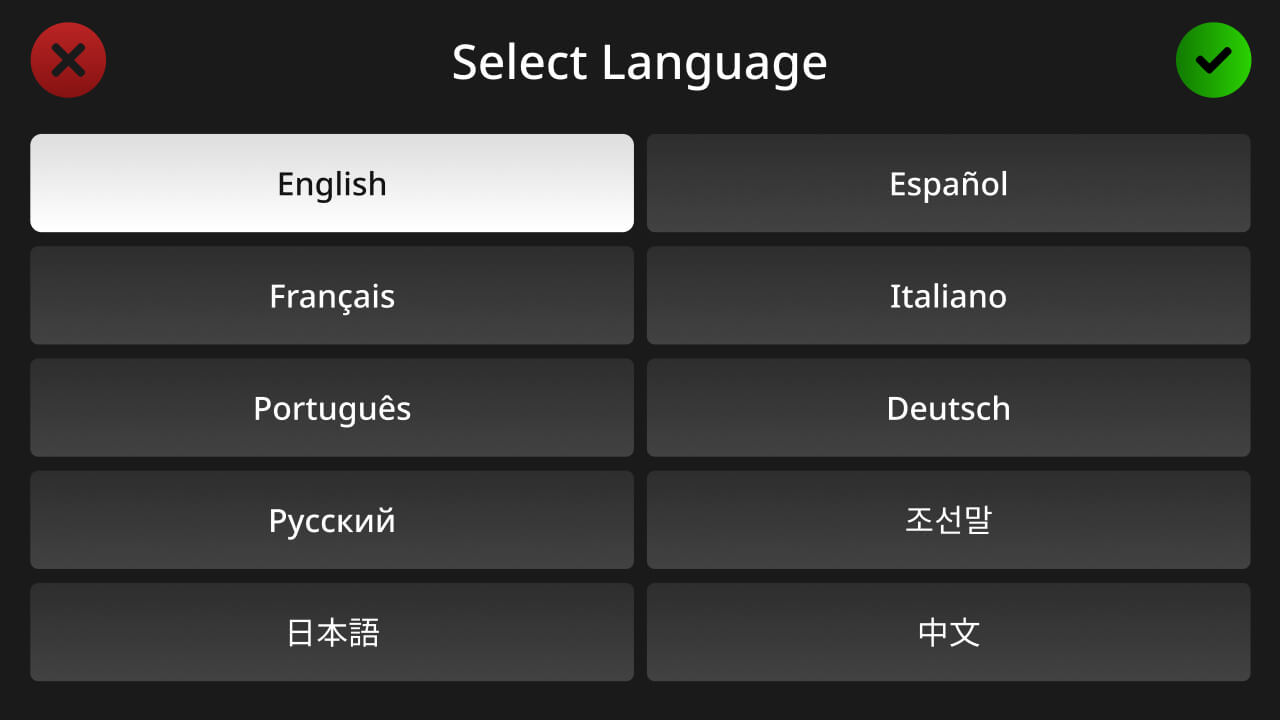
Selecting a Language
After booting up your RØDECaster Pro II for the first time, you will be asked to select your default language. There are 10 languages to choose from: English, Chinese, Japanese, Korean, French, German, Italian, Spanish, Portuguese and Hindi. The default language can be changed at any time by tapping the settings cog and selecting ‘System’ > ‘Language’.
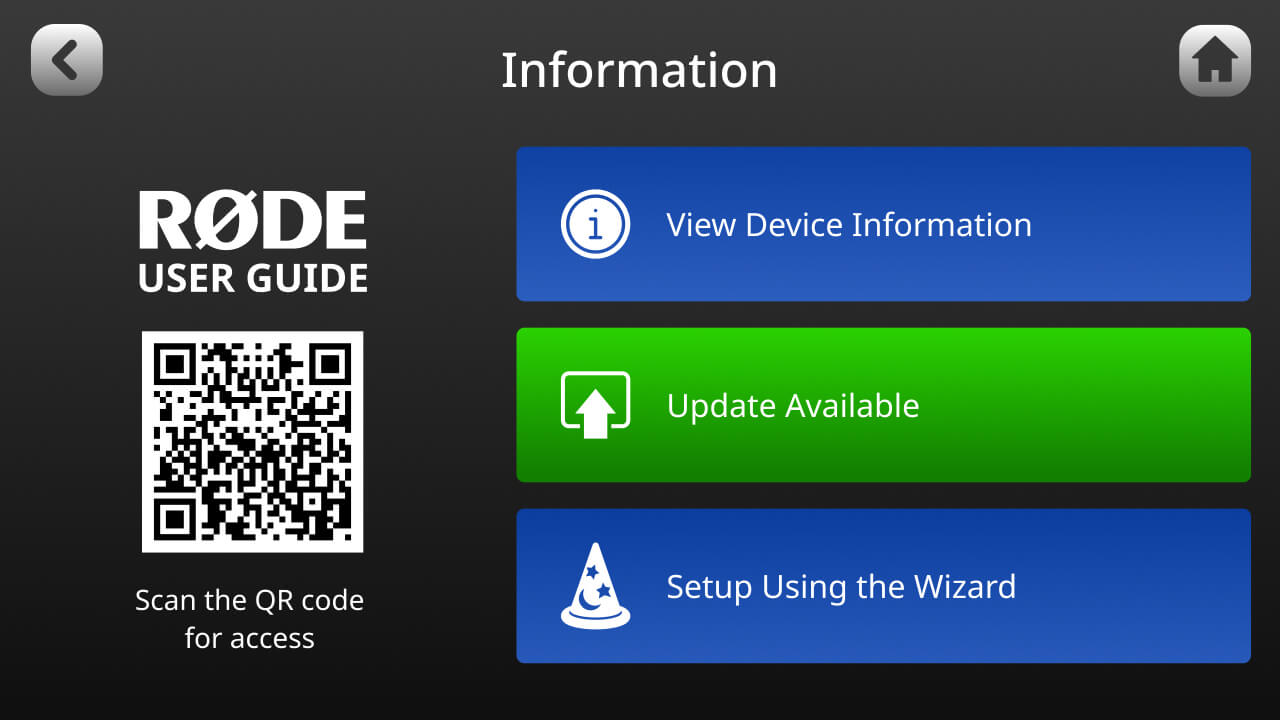
Updating Firmware
Next you will be prompted to connect your RØDECaster Pro II to a computer via Wi-Fi, ethernet or USB to ensure you are running the most up-to-date firmware. Select your preferred connection method and follow the instructions to establish internet connection. If you do not have a computer available or would like to get connected later, tap ‘Don’t Update’.
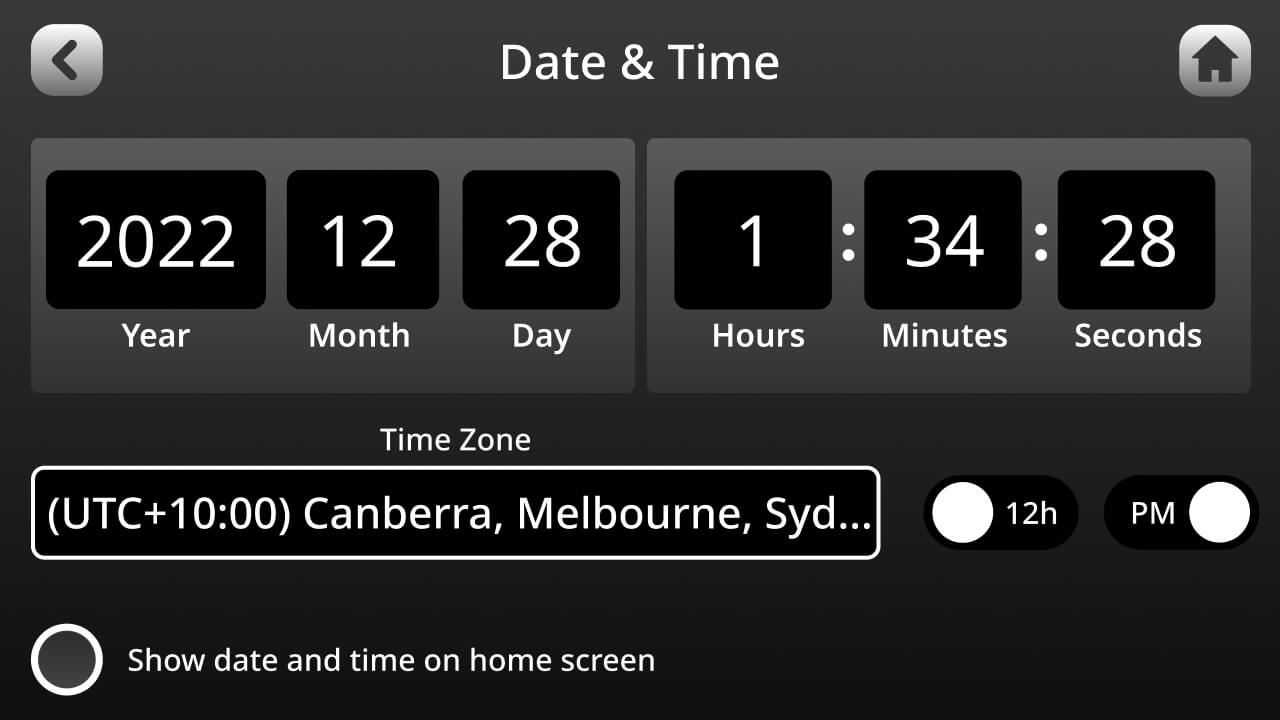
Time and Date
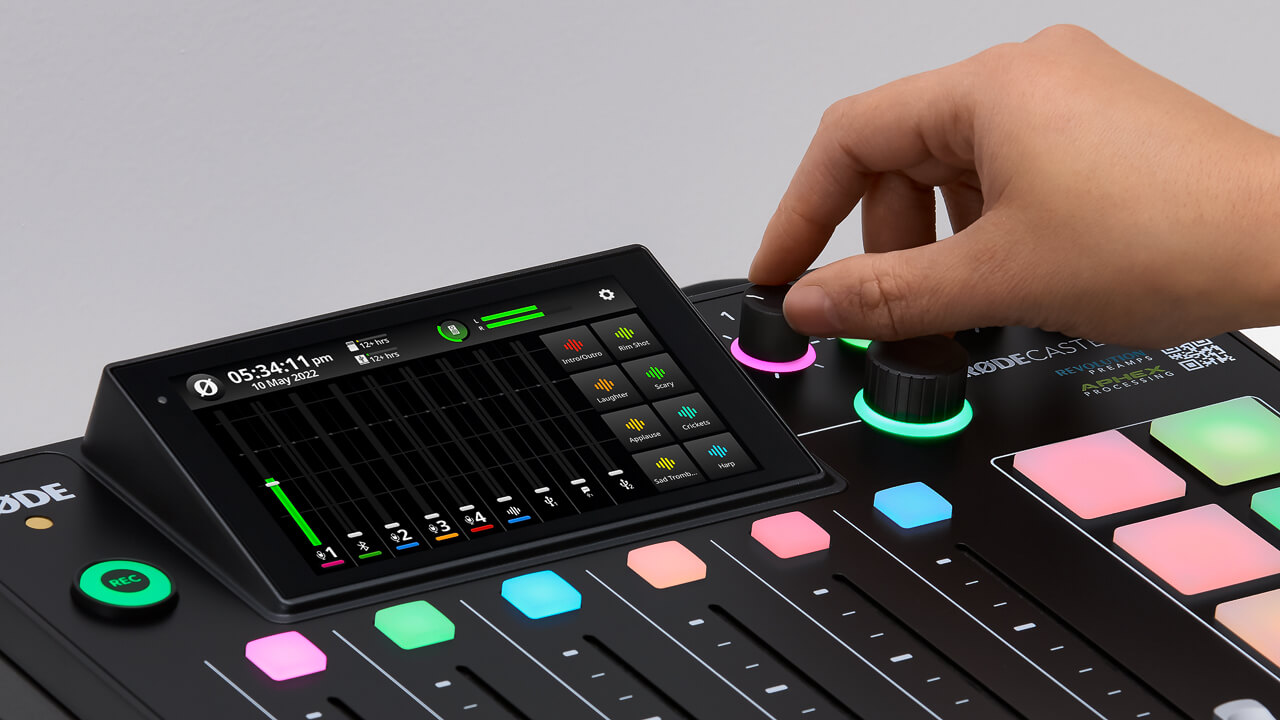
Next you will be asked to configure the time and date for your unit. Use the rotary encoder and touchscreen to set your local time and date. On the bottom left, you can also select whether you would like to show the time and date on the home screen.
The Setup Wizard
Next you will be taken through the Setup Wizard process, which provides step-by-step instructions for configuring your device. These steps are covered below. You can access the Setup Wizard at any time by tapping the settings cog then ‘System’ > ‘Information’.

Connecting Headphones and Speakers
Connecting Headphones
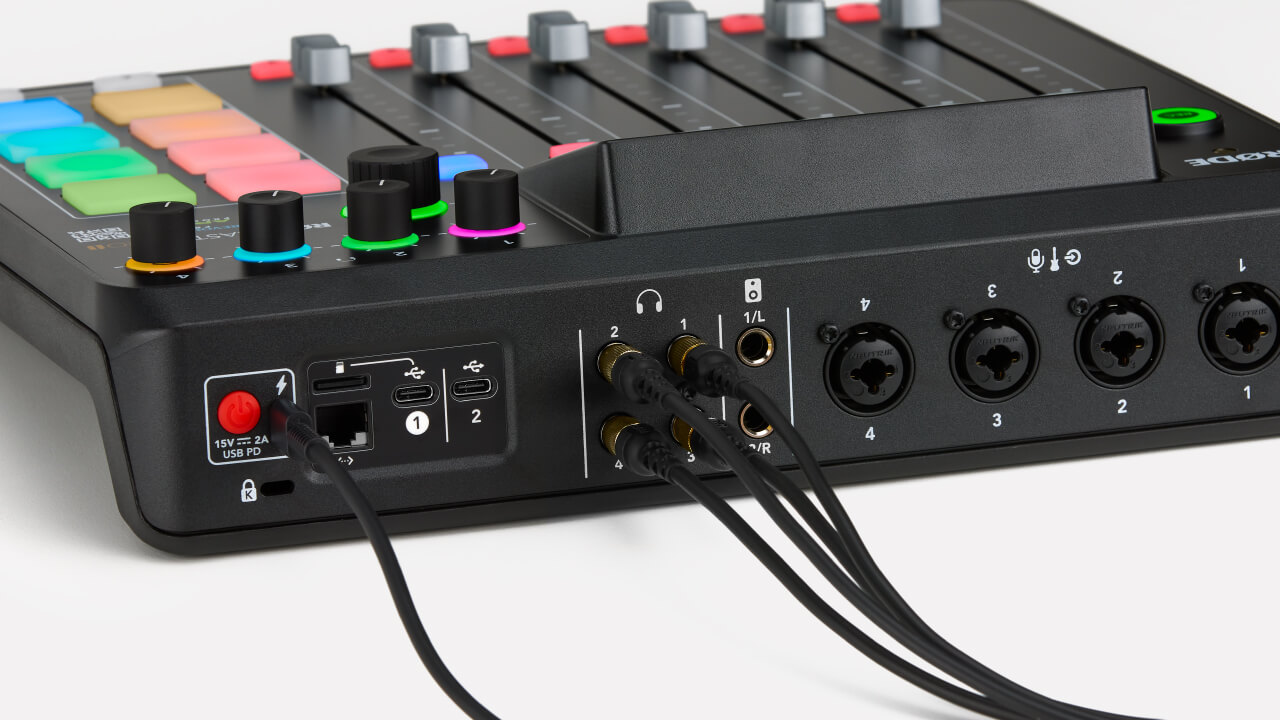
There are four outputs on the back of the RØDECaster Pro II for connecting four pairs of headphones. These feature high-quality ¼-inch connectors. If your headphones have a 3.5mm connector, use a ¼-inch to 3.5mm adaptor such as the RØDE HJA-4 to connect them to the unit.
Pro Tip
If you are the host of a podcast or producing/engineering a recording, we recommend always plugging into headphone output 1. This is because when you press the ‘Listen’ button on a fader, it will only be solo’d for headphone output 1 so you can listen to that channel without disrupting the flow of the recording for other people in your session.Adjusting Headphone Levels
Each headphone output has an independent level control. These are located on the front of the unit and labelled 1-4. This allows you to easily control the volume of your headphones and balance the levels for others you are recording with.
You can also optimise the output level for the type of headphones you are using (i.e., whether they are high sensitivity or low sensitivity). To do this, tap the settings cog, then ‘Outputs’ > ‘Headphones’, then select your headphone type. High sensitivity models have more output while low sensitivity models have less output. Selecting the correct setting for your headphone type will optimise the gain structure to make setting headphone levels as consistent as possible.
Pro Tip
To avoid hearing damage, we recommend always starting with your headphone levels low before setting up your inputs for recording, then turning them up to a comfortable level.Connecting and Using Speakers/Monitors
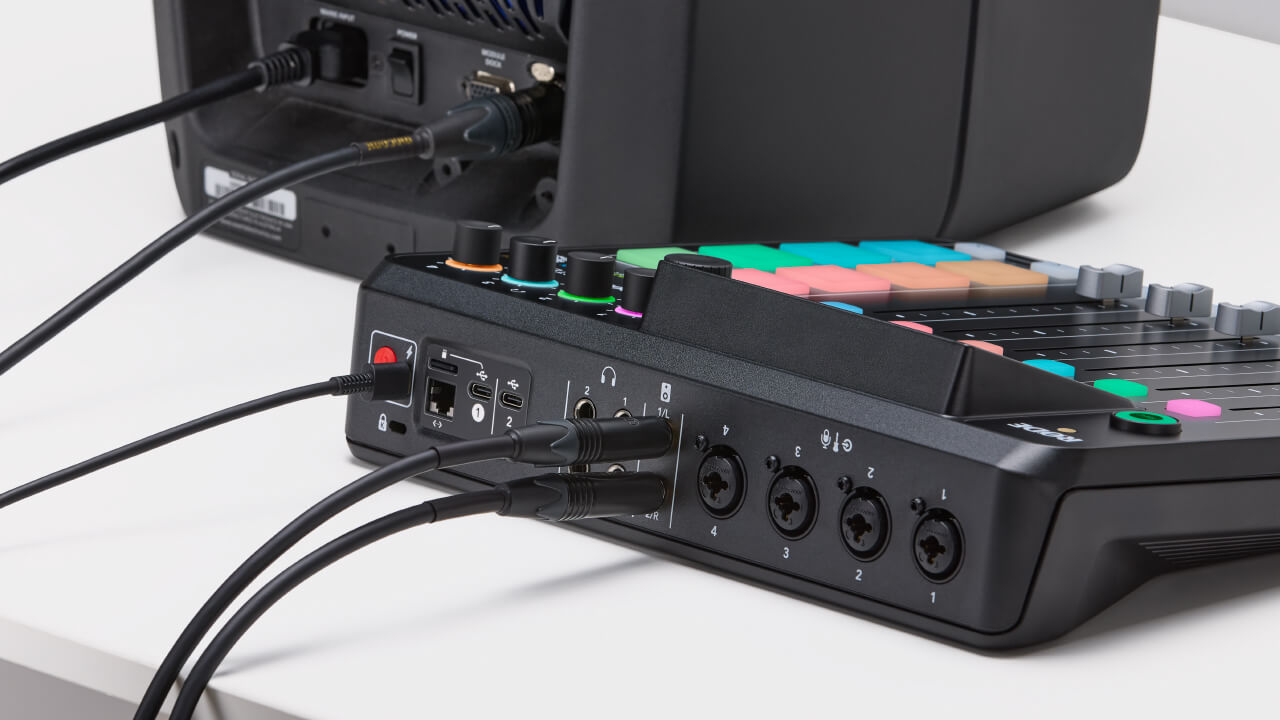
There are two balanced ¼-inch line outputs on the back of the RØDECaster Pro II for connecting a pair of speakers/monitors. These are clearly labelled left and right. The monitor output level is controlled using the rotary encoder on the front of the unit and there is an icon on the top of the mixer screen to check your level.
Pro Tip
To avoid interference or electrical noise when using speakers/monitors, we recommend using balanced TRS cables.Monitor Output Settings
You can access two additional settings for the monitor outputs by tapping the settings cog, then ‘Outputs’ > ‘Monitor’.
Auto-mute Output
When selected, the monitor output will automatically be muted whenever a microphone channel fader is turned up in order to prevent feedback.
Fixed Output Level
When enabled, the monitor output level will be set to line-level and cannot be adjusted. This is useful if you are using the monitor outputs to send audio to outboard equipment, such as broadcast or livestreaming equipment, and want to ensure that your levels aren’t too high or low.

Connecting Microphones, Instruments and Other Devices
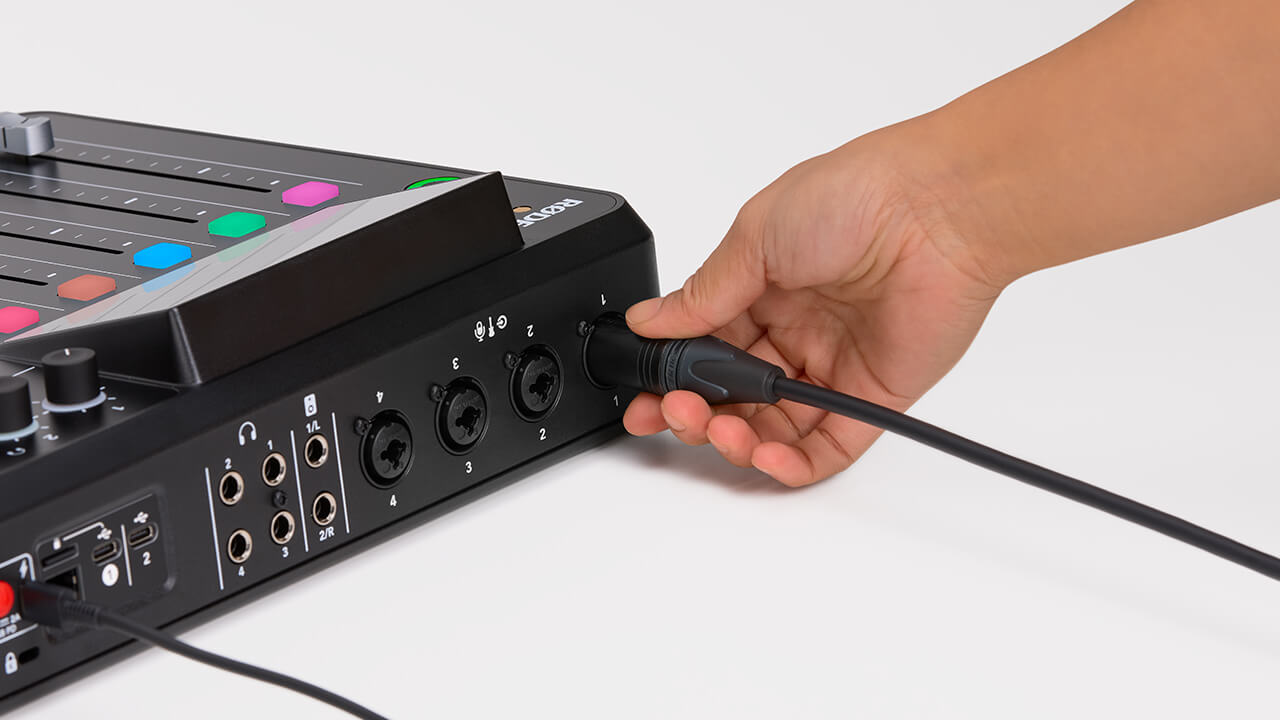
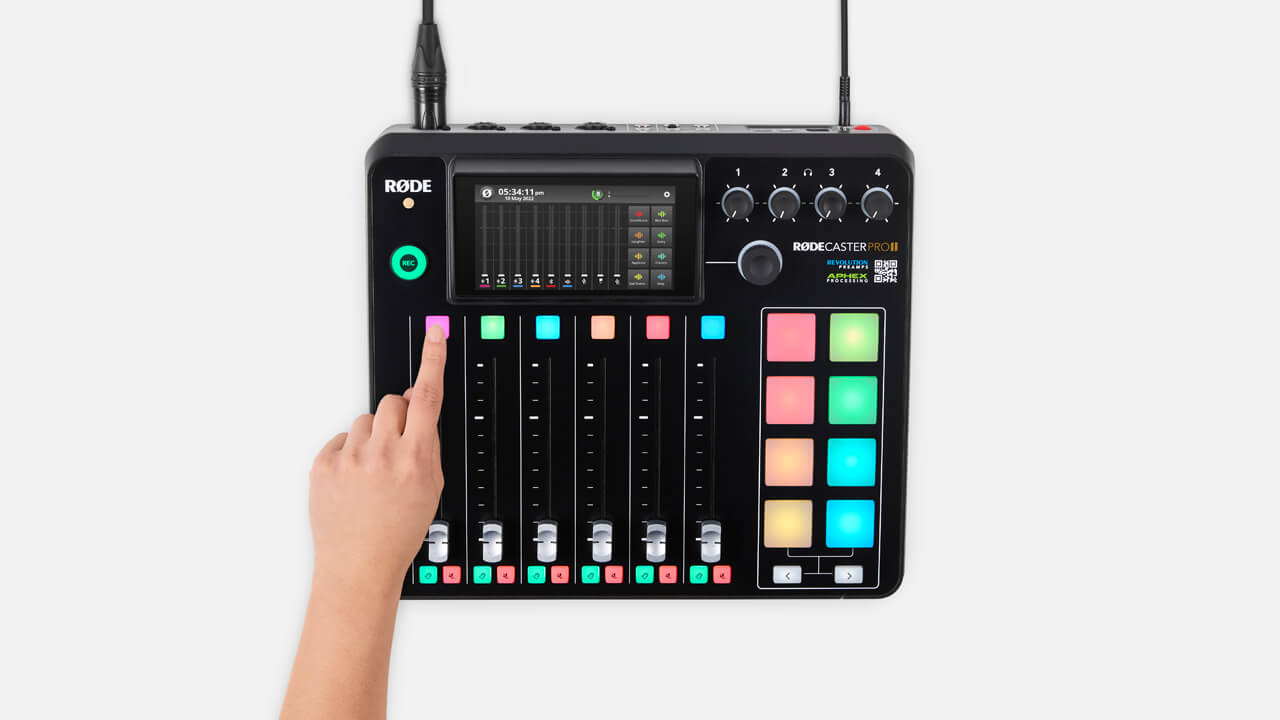
The RØDECaster Pro II features four high-quality Neutrik™ combo jacks for plugging in microphones, instruments (such as guitars and basses), and line-level devices like keyboards and drum machines. In this section, we’ll show you how to connect these devices and get them set up for recording.
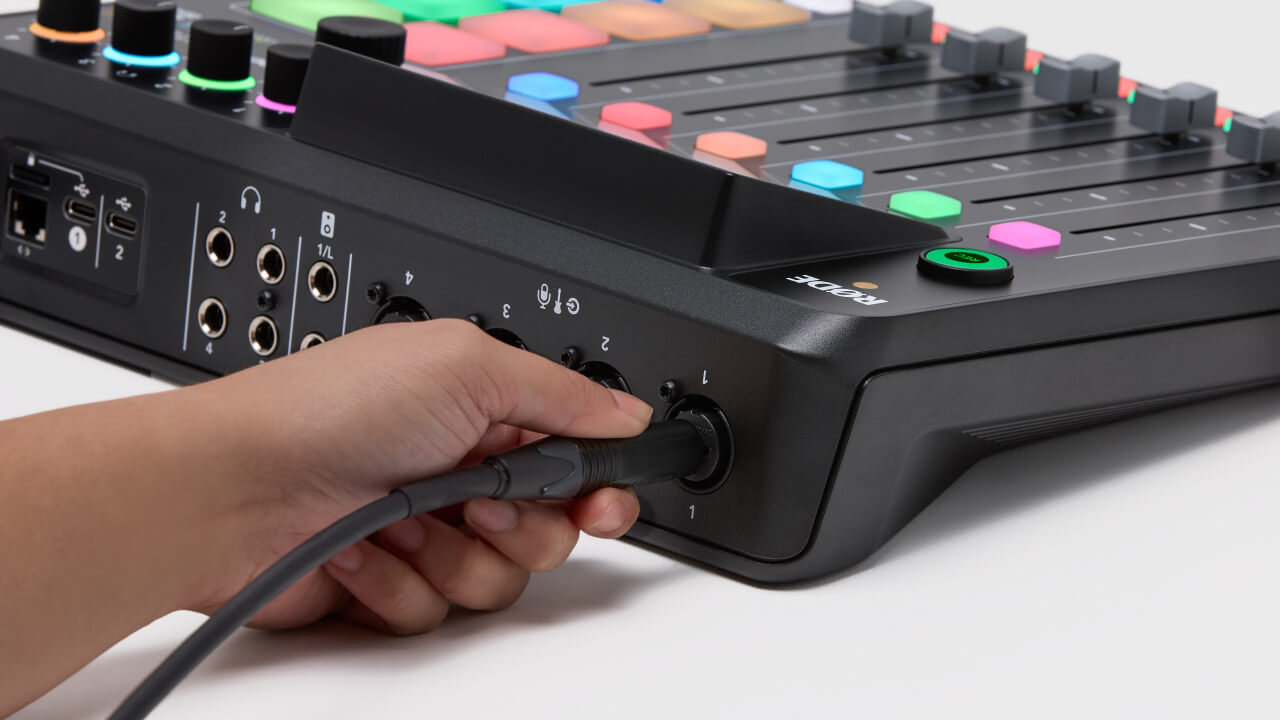
Connecting Microphones
To start, plug your microphone into input 1 on the back of the unit using a standard 3-pin XLR cable. You can use any XLR microphone with the RØDECaster Pro II, including condenser microphones that require phantom power (note: USB microphones cannot be used with the RØDECaster Pro II). By default, inputs 1-4 will be allocated to faders 1-4 on the mixer. Ensuring that fader 1 is all the way down, also plug a pair of headphones into headphone channel 1 so you will be able to monitor your audio.
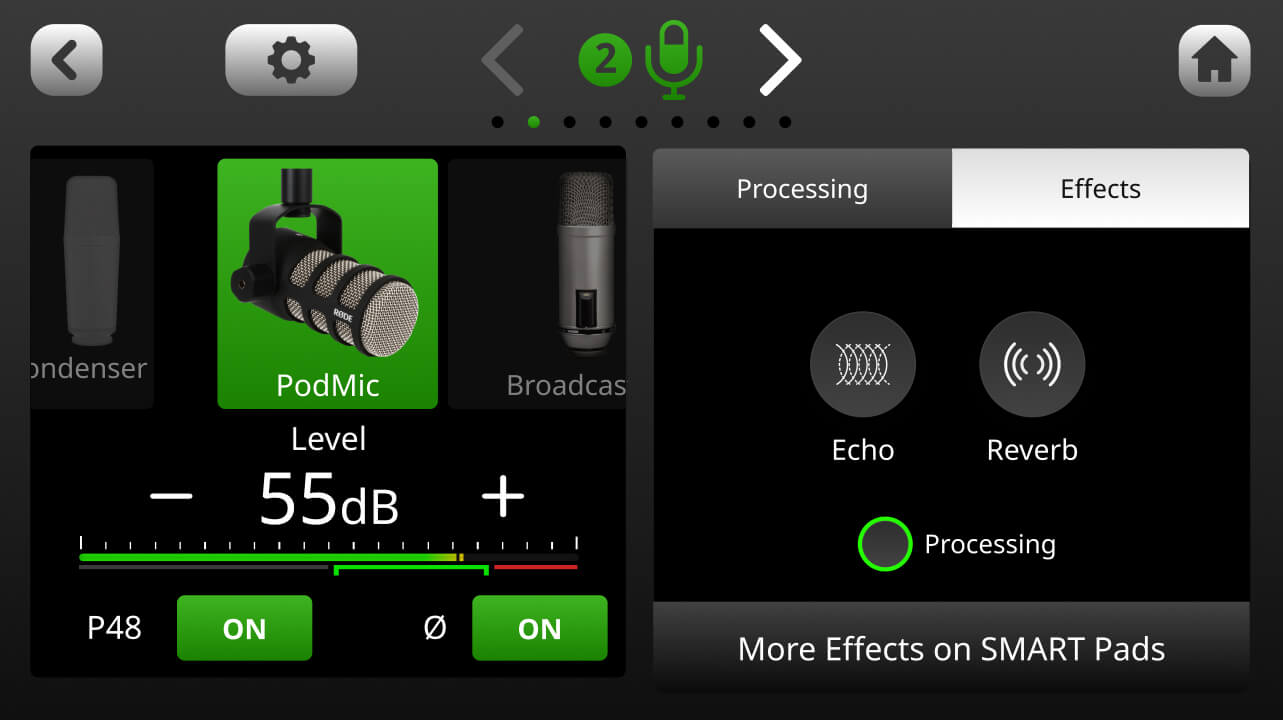
Microphone Basic Setup
To access the channel setup screen for fader 1, press the coloured button above the physical fader or tap the fader on the screen. Here you can select what type of microphone you are using, which will adjust the level, voicing and activate phantom power (if required). If your microphone does not appear in the “mic locker” menu, select the universal dynamic or condenser option. You can also manually turn phantom power on and off.
Pro Tip
The four analog inputs on the RØDECaster Pro II feature our world-class Revolution Preamps™. These are ultra-low-noise, high-gain preamps that will give you plenty of output, even with the most demanding dynamic microphones, while remaining incredibly quiet. This eliminates the need to use a line booster or lifter with your microphones. In fact, the noise floor of the Revolution Preamps is so low, using a lifter will actually introduce noise to your signal, so we highly recommend NOT using one.Setting Microphone Levels
Once your microphone is set up, push fader 1 up to the thick line just over halfway up fader. This represents ‘unity gain’. Then turn headphone channel 1 up to a comfortable listening level. Underneath the “mic locker” is a level meter and gain control. Keeping an eye on the level meter, talk at a natural level as close to the microphone as you will be when recording. Your audio should be jumping around the green section of the meter while you’re talking. If you selected the correct microphone setting, you should already be at a good recording level. Use the ‘+’ and ‘-’ buttons to adjust if required. Repeat this process for as many microphones as you need for your recording.
Note: You may notice that you are still getting levels on the meter even if the fader is all the way down. This is because the fader controls the level that is being sent to the output of the RØDECaster Pro II, not the channel input level.
Tips on Microphone Technique
Good microphone technique is incredibly important for capturing clean, clear recordings and getting the best out of your microphone and recording device. Proximity to your microphone is one of the most important things to consider when recording. You want to get nice and close to the grill with your mouth pointed directly towards it (not off to the side or above/below). This will ensure your voice doesn’t sound distant and allow you to take advantage of the ‘proximity effect’, which will give you a rich, warm broadcast tone. It will also help reduce background noise in your recording as being closer to the mic means you don’t have to push your gain up as much to get a good recording level.
However, being too close to your microphone may result in an exaggerated proximity effect and make your voice sound muddy or affect speech intelligibility. You may also pick up ‘plosives’ (unpleasant bursts of air overloading the capsule) or other unwanted artefacts. Roughly 10-20cm from the microphone grill is a good distance to aim for, depending on your microphone type, sensitivity, and other factors (such as how well sound proofed your recording space is). To get the best placement, use a good microphone stand, desktop tripod or studio arm. You may also want to use a pop filter to help manage plosives.
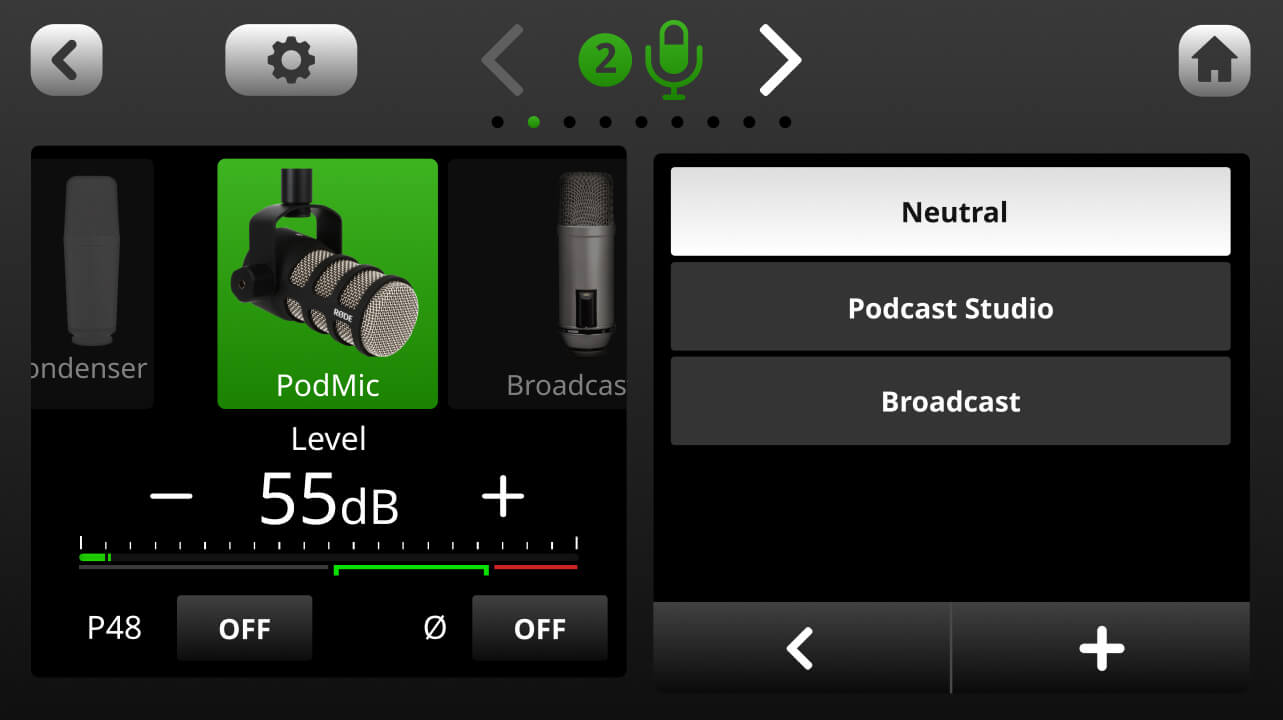
Using Microphone Presets
The RØDECaster Pro II offers a selection of professionally tailored microphone presets ideal for podcasting and livestreaming. To access these, click the ‘Presets’ tab in the channel setup screen. There are three default presets to choose from: ‘Neutral’, ‘Podcast Studio’ and ‘Broadcast’. You can also create your own presets (check out the section on ‘How to Use Processing and Effects’ to learn more about creating presets).
Connecting Instruments and Line Level Devices
To connect an instrument or line-level device, the process is much the same as connecting a microphone: simply plug it in to any of the four inputs using a TRS or instrument cable. Next, open the channel settings screen and select either ‘Line-in’ or ‘Guitar’ from the “mic locker” menu – this will adjust the input gain to a suitable level depending on what is connected. Use the level meter and ‘+’ and ‘-’ buttons to adjust the input gain as required.
Stereo Linking Inputs
If you are using an instrument or line-level device with stereo outputs, or recording a stereo microphone pair, you can link two inputs and route them to one channel. This will allow you to control the level of both inputs with a single fader, ensuring both channel levels are exactly the same.
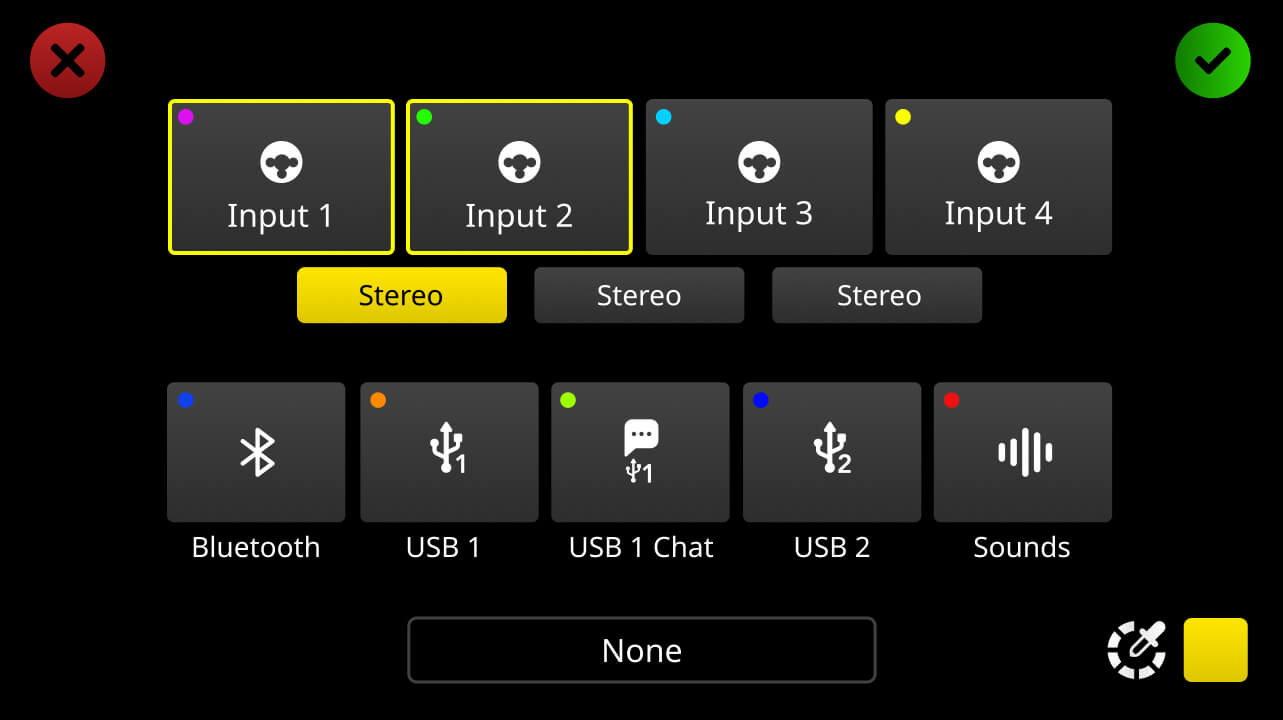
To link two inputs, open the channel setup screen for the fader you want to allocate them to and click the settings cog to access the fader assignment screen. Next, tap the ‘∞’ icon underneath the inputs you want to link (note: you can only link inputs that are next to each other, i.e., 1 and 2, 2 and 3, and 3 and 4). Tap the green tick icon to save. After saving, ensure that you have the correct input type selected from the “mic locker” menu.
Pro Tip
Linked inputs will automatically be panned hard left and right, giving you a full stereo image. You will also notice that faders with linked inputs assigned to them will have two level meters on the mixer screen, so you can independently monitor the level of each input.